Thursday, January 31, 2013

Welcome To Florida, Eh.

We live in Canada.

We have a Florida room.  

Well, I guess I should say that we *had* a Florida room.  I really don't know what it's called now.  Sunroom?  Family room?  All-purpose room?

Way back in July, we had a normal three-season Florida room.  It was cold as ice (ice cold!) in the winter and hothothot in the dead of summer, but spring and fall were pretty nice.  I had a really hard time with decor in that room.  The entire thing was clad in brown, stained cedar.  It was dark.  A little dungeon-y.

So I cracked that bad boy wide open.

Almost looks like it could be a tropical bistro.  Just set up a couple tables and add some handsome waiters.
I had the floor raised about 4 inches so that it would be the same height as the house, rebuilt the walls, put in new windows and a set of double french doors.


And then I realized that I made a mistake.

A *big* one.

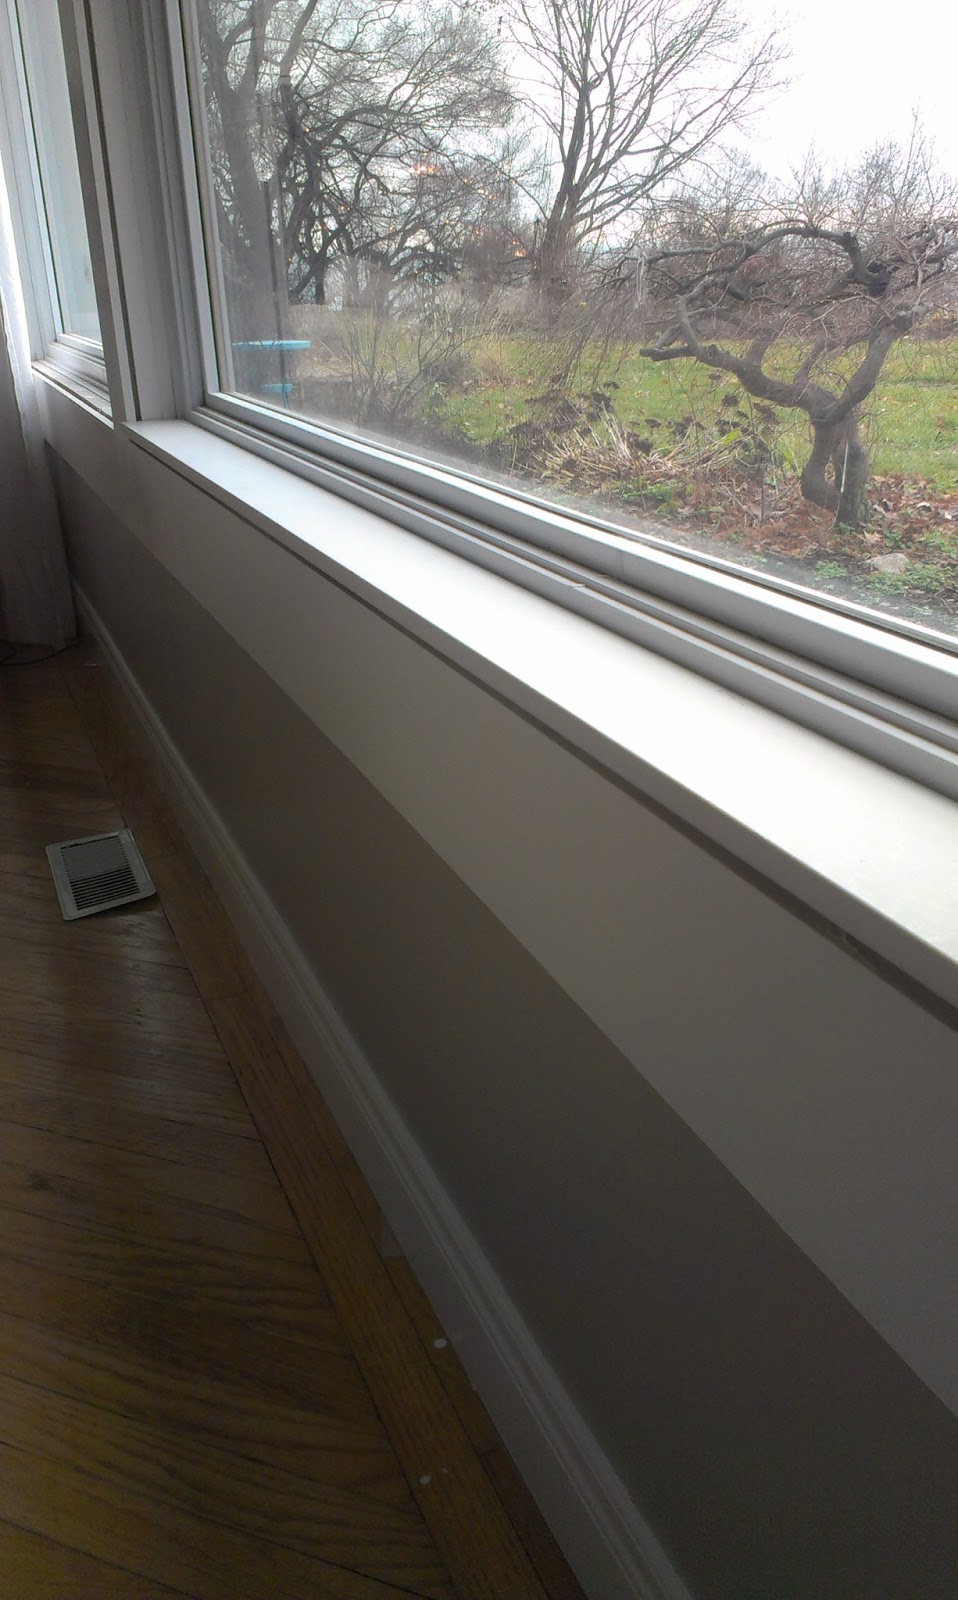
Here's the thing:  when I ordered my windows for the room, I wanted a crank-out, top-opening window so that the bottom part of the window would offer an unobstructed view of the water.  Sounds awesome, right? The cool thing about this meant that even during rain, I could keep the windows open without too much worry.  Easy, breezy, beautiful.

Then they got installed.

And I cried a little. (a lot)

I didn't calculate that the floor was going to be raised 4 inches when I ordered the windows. Now, a couple of you might be saying, "Hey, silly girl, you could have asked them to install the windows a few inches higher."  And to you, I say, "Nice try."  The space at the top of the window is completely taken up as the header, so no dice on moving it.

When I stand in front of the window, the divider between the top and bottom part is right. smack. dab. in front of my eyes.

Sad face, y'all.  

But!  But!  But!  See that chair right there?  That was my saving grace.  It kept me sane.


If you sit in the chair, the view is p-e-r-f-e-c-t.  And, since this room is going to be the family room with a nice, relaxing seating area, you'll almost always be sitting and enjoying the view.  BOOM.  <drops the mic>

Whenever someone came over and walked through the sunroom family room Florida room, I ordered them to sit in the chair and tell me how great the view was.

But it was still dark, guys.  Still depressing.  Oppressive.

And so I took a little look-see at some of the photos of rooms that made me happy:

(via)

(via)

One thing connected them all.  Beautiful, painted wood ceilings.

So, we busted out the paint sprayer and got bizzy, yo.


It's SOOOOO much easier to paint a room when you're not freaking out about the floors.  I got started on the board and batten walls prior to laying the floor.

Getting better....
I did the top of the walls in the same color as the rest of the house.  This room can be viewed from just about every other room in the house and I wanted to keep a sense of continuity with the design and colors.

Then it was time to get down on bended knee and lay some flooring.


I'll do a separate post on the flooring sometime soon.  I've got lots of opinions on this particular style of flooring and it'll need its own soapbox.

Once the flooring was done, it was time to take a little break and celebrate for a minute.


I think the paint and flooring, even though it's dark, really added a lightness to the room.  I love it.  Like, lovelovelove it. This photo was take just after Christmas.  I've since added the actual board and batten, my office, some built-ins, draperies, and a laundry room. I can't wait to share the rest of the room's details over the next week.  Tomorrow, we'll talk about making easy built-in shelves.  Get your tools ready!

Tuesday, January 29, 2013

How (not) To Install Window Trim

Just so that we're clear right from the very start, I'm not a professional.  Like, at all.  Occasionally, I take some ugly shortcuts in a project in an effort to save time, money and sanity.  Actually, it's usually to save all three.  Simultaneously.

This is one of those projects.  Don't say I didn't tell you off the bat.

Let's just move forward and get through this together, okay?

After our window wall got ripped down to the studs, we were left with this:


Drywall went up and looked like this:


Unfortunately, I didn't get too many pictures of the actual process of putting up the window trim.  With this particular bank of windows, I chose to get funky and make up the trim as I went.  Basically, I bought a 4x8 sheet of 1/2 inch MDF and had the store rip it to the sizes I needed.


When you do this, keep in mind that it OFTEN results in inaccurate cuts.  When that happens, you have two options:  1. Re-rip it at home on your table saw or with a circular saw (this is really only if it ends up oversized), 2. Suck it up and just try to fudge your measurements to deal with the minor inaccuracies.  I usually go with option numero dos.


How pretty is that pile of crap in the backyard?  So pretty!
The drywall guy would just toss his scraps out of the 2nd floor window as he worked upstairs.  Then, he'd go out in the back at the end of the day and clean it all up.
Once I had my MDF trim all nailed in, I added a decorative bead of trim at the top and filled in the nail holes and some of the gaps with wood filler.  I threw on a coat of primer and two or three coats of Behr's 'Polar Bear' white.

Then I needed to contend with the big, huge, giant, ugly gaps at the bottom of the window on the sill.  Right about now is where my carpentry credibility starts breezing out of this window.


Since the window measurements were a little 'off' in some spots, the trim I put up was a little 'off' in some spots.  To make up for this, I added some scraps of 1/8 inch shims to get my sill trim to lie flat.


You're welcome for the awesome photography.

When I dry-fit the sill on the window, it seemed a little wonky.  So, I figured some construction adhesive would help with stability.

About that construction adhesive.....

Remember how I said I sometimes do things in an effort to save a couple dimes?  Well, I found an unopened tube of Liquid Nails, but I could NOT open that thing to save my life.  I sliced off the tip.  Nothing.  I stuck it with a long framing nail to try to coax it out.  Nothing.  I tried squeezing the tube.  I broke the whole end-piece off.

<le sigh>

So I did what I feel any other frugal homeowner would do.  I grabbed a butter knife and started digging.

Yes, in hindsight, I should have used a plastic utensil.  But this was a fancy occasion.

And I started spreadin'.

Like butter on toast.  Thick, poisonous butter.

Then I placed my sill trim back on top to make a delicious sandwich.


But I was left with a rather thick gap on the underside.


A spare piece of trim salvaged during demolition and a couple coats of semi-gloss paint made everything look a bit more tidy.


And within hours, it became the stage for Rudolph and his gang of wayward misfits.


Monday, January 28, 2013

She's A Brick......Wall (Before and After)

So the fireplace mantel was looking....... a little washy.  Matchy-matchy with them there walls.  And the concrete nothingness was even more apparent.


So, I grabbed some paint.  And I done painted.  And a somewhat magical thing happened.

(brick is Glidden's Unicorn White - the walls are Glidden's Shadowbox)
The old concrete voids just kinda.....disappeared.  Prior to painting, I was stressin' about how the heck I was going to make fake, little brick façades.  I was scheming to use some 1/4 inch mdf, beat them up a little and then adhere them to the wall.  But you know what?  Not on my radar right now.  Painting out the wall really helped to shorten my 'to-do-now-because-it's-driving-me-nuts' list.  And that, friends, is a good thing.

However.

Can we just say b-o-r-i-n-g?  That's the most neutral wall in the history of neutral walls.  I could feel the above-mentioned list lengthening.

Every time I sat down on the sofa, I looked at that wall and thought 'it needs something --- some contrast'.

And then John and I got the flu.

So I had to stare at that wall a little longer.  I couldn't move.  I was so tired and miserable and gross.  But my DIY blood is thicker than influenza.  I don't know if that makes sense.  I marched out to the garage (in my pajamas - in the middle of the day), grabbed my trusty Kreg Jig and got jiggy wit' it.


("You got a - Prada - bag with a lotta - stuff in it - give it to your friend - let's spin")

While I was in the garage, I grabbed my Kreg, a bigass mirror and some pine 1x5 boards and got to work.  In between coughing fits.

Here's my Kreg that John jigged up for me.  Get it?  Jigged?  Forget it.....  

The writing on there says,
"Make me something pretty.  Love, John"
I mitered the boards and then drilled pocket holes on two of them.  A small bead of glue and some 1.5" Kreg screws later, I had a simple frame.


I carefully laid the mirror face-down and added some mirror clips.


One I screwed all the clips in, I said a prayer and turned the giant behemoth of a mirror over.


Whew.  That was hard.  Now it was time to get to the 'contrast' part of this project.  I taped off the mirror and applied one coat of Minwax's Dark Walnut stain.  

It's like a little miracle in a little can.
A couple things to note:  

1. Wear gloves.  This stuff is stain.  It will stain everything it touches.  Including your hands.  And you'll look like you have a strange case of reverse-vitiligo when you pick your kids up from the bus stop.  

Ask me how I know.  Dammit. 
2.  Crack a window, would ya?  Ventilation is a must with this product.  Whenever I stain something, John *always* walks in the door and says, "It smells like death in here."  It never fails.


After a single coat, the mirror looked like this:


Now, had I not been sick, I might have remembered to stain the back of the mirror first.  Why?  When you put a frame up against a mirror, a small amount of the back side of the board reflects into the mirror.  I forgot to do this, even though I know better.  To get around it, I had to drip gobs of stain along the edges of the mirror in an effort to get the back of the board to soak it up and not reflect the light wood color.  It worked in most spots.  

Once finished with the stain, I did *not* let the stain dry fully and just slapped a couple thin coats of polycrylic on that bad boy.  You're supposed to let the stain dry fully.  Mama don't got that kinda patience.

Once the polycrylic was barely dry to the touch, I whipped it up on the mantel and reclaimed my place on the couch to continue being flu-ridden.  This time, with a much nicer view.


Now, I'm itchin' to put some art up on the wall to the right of the mirror.  Maybe some subway prints?


TDC Before and After

Friday, January 25, 2013

Come On Baby, Light My Fire. Place.

Let's keep this show moving and get to the rest of the living room, shall we?  One of the walls that had me scratching my head was the fireplace wall.  As you can see in this terrible photo, we had these awesomesauce concrete floating shelf things that jutted out of the wall at what appeared to be random spots.


I'm sure they *weren't* random and that they were lovingly and carefully crafted by someone in the 50's or 60's, but I just didn't appreciate them.  Most importantly, they interfered with my master plan.  Everyone knows you don't mess with that.  So they had to go.


My builder worked his magic (which was also his hammer and chisel) and knocked off the slabs-o-awkward and this is what I was left with.  I was originally thinking that I would re-tile the wall in some crazy, dramatic stone or maybe even just drywall over it and start with a nice, blank slate.

But then I changed my mind.  Strange.

So, I decided to keep the brick, but now I was fixated on a proper mantel.  I think it was like three weeks away from Christmas in this photo and I was scheming.  Scheming of a way to get those stockings hung by the chimney with care.

But the scheming was taking a little while.  I made everyone live with the crazy mantel chalk outline of death for a little longer while I wrapped my head around how I was going to do this.

The tape stayed up longer than I'm actually going to admit.


I started by looking for some inspiration.  I pinned many a pin.  I tore out magazine pages.  I scoured and studied as many tutorials as I could get my hands on.  I was on a mission, y'all.

I was also on a mission to not spend ANY money out of pocket.  I knew I had a bunch of supplies and yes, it would be WAY harder to customize the mantel according to what I had on hand, but I knew it would feel good to know that I didn't break the bank trying to make my vision materialize.

So I dove right in.


I like to think that my little team of nutcrackers were cheering me on.

Using my fancy, high-tech tape outline, I was able to gauge the maximum height that I wanted the finished product to be.  Sometimes I lose sight of the overall project dimensions and end up with craycray proportions.  I really didn't want that to happen with what would probably be the focal point of the room.

I started by adhering 2x2 pieces to the brick using a masonry adhesive.  They were going to act as my cleats and allow me to attach my mdf frame around the fireplace with my 18 gauge nail gun.


Then I had to cut the crown.

And the world went dark for a couple hours.

I could NOT, for the life of me, get this stupid crown to meet up properly.  I was reusing some crown that was used in our old bedroom before we tore the ceiling down and I went through a LOT of scrap.   I eventually got it to meet up close enough at the corners and just sanded  the bejeezus out of it.  It's not terribly noticeable in person and if anyone walks up to it and points it out, I'm going to hand them a cookie and kick them out of my house.  You've been warned.

Once I got the frame worked out, it looked a little plain, so I found some mahogany shim scraps that the drywall guy used to square up the walls prior to boarding.  I mitered the corners and glued them on to the face.


Then it was time to slap some paint up on this old new girl.


Pretty neato, if I do say so myself.  But there were some nagging issues:


She needed to get the old Dap treatment.  Oh, the sins that are hidden in my home because of this stuff...

Check out the after:


Smooth as a baby's bottom.  What's that?  You don't believe me and want a closer look?


Perfect-o.

One more look?  Two?


About a week after I finished, I was looking through some of the inspiration photos I had filed before I started and came across this:


I pretty much NAILED my inspiration photo and I wasn't even using it as guide.  Crazy.

When all was said and done, the white mantel looked a little washed out against the white brick wall.


Stay tuned for my next post to see how I remedied that situation *and* managed to do some camouflaging with the old floating shelves.  Oh, the suspense!